Cloning for Fun and Profit

- You want a nearly-perfect replica of a specific plant. For any given strain, there are a handful of "phenotypes" that can spring from seeds. Not all will grow exactly the same and even if you make seeds from two typically short plants, what comes out of those seeds may really surprise the shit out of you. For the most part it will stick close to the phenotypes ("way or appearance of growing") but there will be outliers that will grow in all manner of crazy ways. All of this is not a problem with outside grows but inside you want/need the densest plants at the shortest size you can get, so they can be safely managed indoors. Seeds will not give you that but cloning can. Cloning produces a near-perfect copy of the source or donor plant. Some variation is not unheard of but for the most part, you can count on these being similar alot more than you can with seeds.
- You not only want a replica of a specific plant but maybe you want alot of them on a regular basis. Cloning will do this. Through this very very basic method I show here with very modest equipment I can turn out a half-dozen new perfect replicas every two weeks. Thus a "mother" plant can spawn dozens of generations and in fact these here are the third generation of these plants; the first generation is finishing in the trellis, the second just got put to bloom the other day; it is this plant that was the donor for the clones in this story. As you will see, the mother plant was growing in such an amazing way I just had to have more of them as they will grow into the perfect indoor medicine producers.
- Perhaps where you are you can't get or make seeds of your own; a cutting from a friendly grower is all you need to grow an unlimited amount of medicine for as long as you are able to. So learning these techniques is a pretty valuable skill to have.
- Controlled cloning actually provides the missing piece of the continuous grow or harvest model. As you recall, you rotate plants about every three weeks; I take cuttings the same day as the rotation (from a different vegging plant, not the one moving to bloom, that could cause shock). Two weeks later they are rooted and on the third week they are ready to transplant into the to-go cups to join the rest in the veg tubs. It closes the loop on the growth cycle where as long as you stay with it, this will produce the best medicine you have, literally forever. Well, as far as you are concerned.
Now when I first started cloning I went all mad-scientist, I looked like Gil Grissom on CSI doing my clones.....

Now, years later I have settled into a much mellower, much easier routine. I used to think this was such a complex, nerve-racking process but here is the secret kids: its less your technique and more (like almost all) in two things; 1. start with quality source material. 2. Have a really solid home for the cuttings to root in. If you stick with those two things, your cloning will succeed far more than if you go getting all tricky with the cloning process itself. There are 101 ways to root clones, from sticking them in just water or dirt, to rock-wool cubes and aero-cloners. All will work sometimes, some will work more often than others.
The basic technique I show here will start with this plant:
 |
| Donor plant: Black Diesel, perfect indoor phenotype. Pardon the purplish tint, its the grow lights. |
And end up with six cuttings/clones in this very modest mini-DWC (Deep Water Culture) hydroponic rig available from Amazon here:
 |
| Mini-DWC workhorse. Air and nutrient bath added. |
Alot is put into the idea that you need a special medium to root clone cuttings in; in this case, I use nothing trickier than the netcups that came with it and simple pieces of sponge (which also come with it). They are pretty small but perfect for our indoor needs:


OK, time to get from there to here...your source plant is ready, your target rooting tool is ready; get your tools together and you will be ready too.
1. The tools:
 |
| Basic cloning tools; classy Dollar-store cupcake tray not included. |
The tools you will need for this include a sharp, clean razor blade, a container of rooting compound you can get from Amazon or literally anywhere and a container of water. More on that in a moment. You will observe I also have the six netcups and sponges at the ready as well.
2. Check out your donor plant and pick some bud-bearing stems near the base. Note: don't clone with fan-leaves. You can tell the difference because bud-bearing stems also tend to have branching whereas the fanleaves don't branch.
 |
| Two possible donor branches in the black circles... |
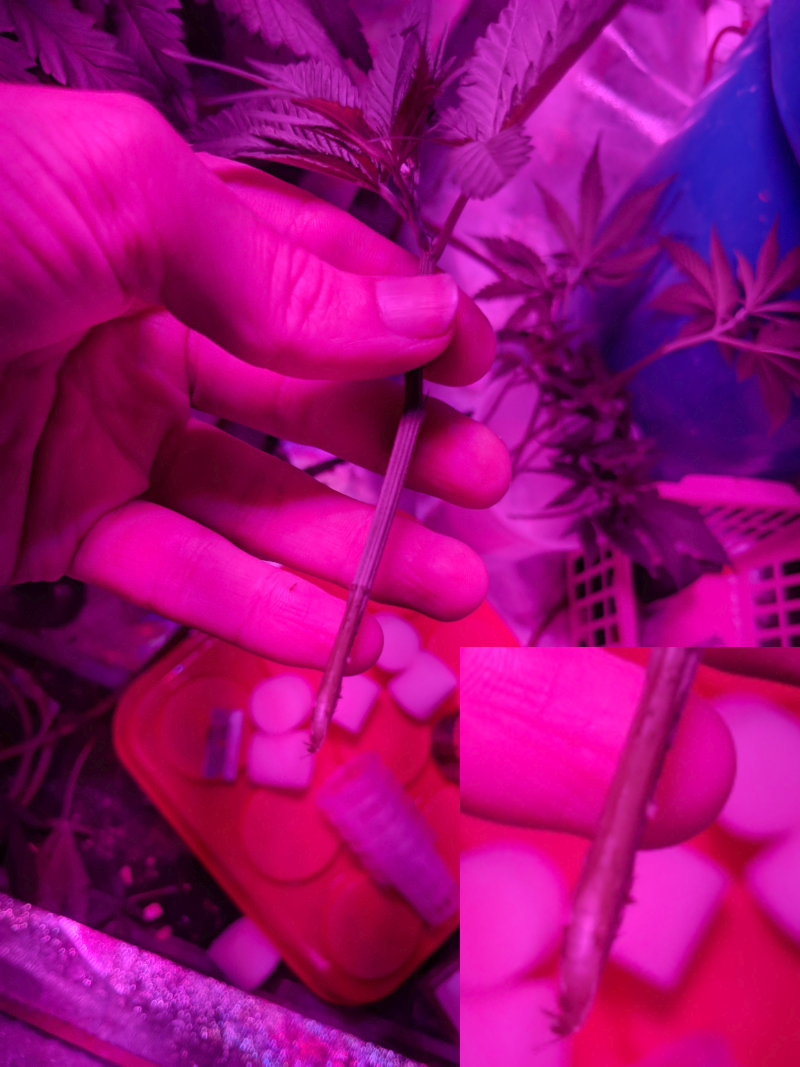
3. Once you select your target cutting, give yourself plenty of room with the razor blade (IOW get other branches and leaves out of your way) and cut it parallel to the main branch. See the white line here...

4. Once you take the cutting from the plant, immediately stick it into the water you had prepared for the purpose. Doing this reduces the chance the exposed cut will result in air getting into the plant which can cause all manner of hell. Exposing it to the air as little as possible is a good thing. Now that you have taken the cutting, you prepare it as follows. For each cutting you take you should:
A. Prune off all extra small limbs and leaves except for the very last two at the tip of the plant. Cut these even with the cutting stem.
B. Cut the clone to a length of about 5 or so inches from the tip (where the last two leaves are) and try to do so at a junction of where a branch or leaf used to be.
C. Diagonally cut the end so the cut-end of the clone is at an angle. Further, use the edge of the razor blade to gently scrape some of the epidermis of the cutting base off.
This is what it looks like at this point:
5. Finally, dip the cut-end of this in rooting compound for about 30 seconds or so; the timing isn't critical other than you want the rooting compound to soak into the cutting somewhat. Now I take it from the rooting gel (purplish stuff), wrap it in one of the sponges like so:
 |
| Cutting in sponge with rooting compound |
6. Once situated, I then trim the tips off of any remaining leaves:

The idea here is that the cutting has to figure out what to do, where to spend its calories, so to speak. By cutting the top this way, these leaves will no longer grow in size and the sugars that would gone to that kind of growth will go (in theory) to the rooting process. I suppose. I do it, everyone I know does it, every clone I have purchased came like that so....there ya go.
7. Seat the sponge in the netcup:


8. Now lather, rinse, repeat with the remaining cuttings. Here is the fun part. At least when I do it, the cuttings tend to look bad when I first take them. Oh hell, who is kidding: mine look like they lost a bar fight and now need bail money:
 |
| The Forrest Gumps of clone cuttings |
Two weeks later, to the day these cuttings were taken...
This is how they look after exactly 14 days. They have in fact all been rooted for a few days already so I put the actual root date at about 10 days...
 |
| Look Ma! Roots! |
Comments
Post a Comment